How often has your mind wandered to the safety and well-being of your kids or loved ones back at home in the middle of an important meeting? More than you would care to count, I’m sure. So why don’t you just pull out your toolbox, get hold of some electronic equipment and build an Are You Okay Widget? With us to guide you, of course. Are You Okay widget is a small device that can connect to wireless networks and notify others whether you are ok or not. Pretty Cool!!
What You Need to Start Off
- Electric Imp
- Electric Imp Breakout
- Accelerometer
- Diffused LED – RGB 10mm
- 4 x AA batteries
- 4 x AA batteries holder with cover
- Soldering rod
- Solder iron
- Break away 40-pin male headers
- Jumper wires
Electric imp is a Wi-Fi enabled platform that provides the hardware, software, OS and API to connect any device to other devices as well as the Internet. It provides the connectivity for creating Internet of Things.
Accelerometer is a device that detects physical motion in any device to which it is connected.
Assembling the Widget
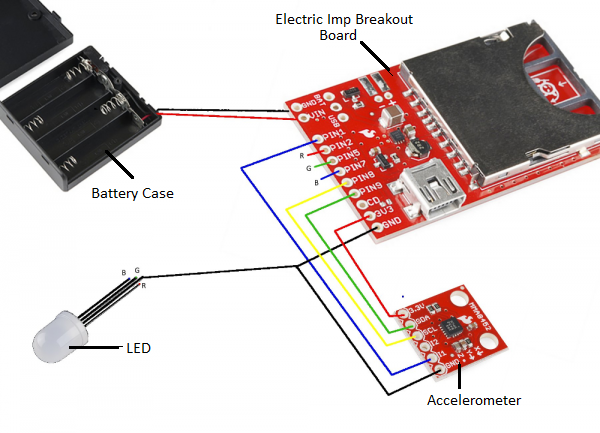
Image Source: Learn.Sparkfun
- First we will solder header pins – 2 pins to GND and VIN for the battery, 9 pins to the breakout board and 6 pins to the accelerometer, as shown in Figure 1.
- Solder the wires of the battery to the GND and VIN.
- Now that you have your header pins in place, use jumper wires to make connections as per the color coding in Figure 1. The connections are also listed in the table below.
| Breakout Board PIN | Wire | Connected To |
| PIN1 | Blue | Accelerometer I1 |
| PIN2 | Red | LED red leg |
| PIN5 | Blue | LED blue leg |
| PIN7 | Green | LED green leg |
| PIN8 | Yellow | Accelerometer SCL |
| PIN9 | Green | Accelerometer SDL |
| CD | No Connections Required | |
| 3V3 | Red | Accelerometer 3.3V |
| GND | Black | Accelerometer GND |
| GND | Black | LED cathode (longest leg) |
Loading the Code
After your wiring is complete, insert the electric imp into the breakout board and log into the imp IDE. You can view the video at the end of post to familiarize yourself with the IDE before doing the actual coding. There are two parts of the code that you need to load into the IDE – device code and agent code. Agent code handles instructions and requests via the Internet. Device code runs on the device and handles imp’s response to instructions or situations. You can get the latest agent and device codes on Github.
You can code the device to send you a mail or text message or tweet if the device is not moved/patted for a certain interval.
Using Your Are You Ok Widget
Once your codes are in place, you can put the widget in a soft toy of your choice to make it look attractive. Take care to clip the wires in a way that they don’t move when the toy is moved. The other part like the board and battery case should also be secured tightly and you are ready to go.
Electric Imp IDE Video Tutorial
Related Posts
Fun Experiment to Determine AA Battery Life


