Do you want to learn how to make a simple generator? Well here is a simple procedure that you can follow.
What you will need:
- 4 pcs ceramic magnet (1x2x5 cm): either Edu. Inv M-700, CMS, HFT or R Shk #64-1877
- 1 spool of magnet wire (#30) with a length of 200 ft. (Rad. Shack 278-1345)
- 1 pc miniature lamp, 1.5V 25mA Rad. Sh. #272-1139 or #48 lamp or All. LP-3
- 1 pc cardboard strip (8×30.4 cm)
- 1 pc large nail, 8cm long (or more)
- Knife or sandpaper for wire strippping
- Tape to hold the wire down
- Hand drill for spinning
Note: Use these exact parts to make the whole generator work.
What you need to do:
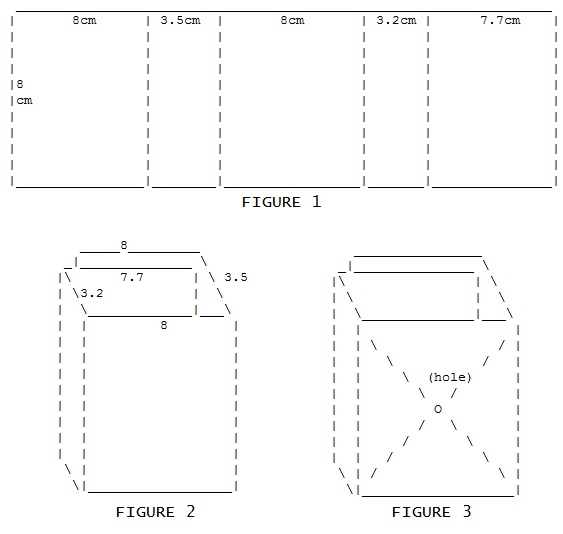
- Create a hollow-ended box. Lay out the cardboard strip in a horizontal manner. Mark the longer side (30.4cm) of the cardboard strip according to the following specifications: 8cm, 3.5cm, 8cm, 3.2cm and 7.7cm. (See FIGURE 1)
- Fold the cardboard according to the specifications and tape to secure it. (See FIGURE 2)
- Poke a hole in the center of the box by using the nail (see FIGURE 3). It has to go through all three layers (8cm, 7.7cm and 8cm). Make sure the hole that the nail will make will be big enough so the nail will be able to rotate in it.
- Clamp the 4 magnets around the nail and try to give it a spin. Make sure that the nail with the magnets are able to spin freely. Check if the corners of the magnet bump inside the box as they are spinning. If yes, then you need to either make a bigger box or use a thinner nail.
- Get the spool of #30 magnet wire. Tape the end of the wire to the side of the box and wind it around the box. The length should be able to complete 250 turns. Wind the wire in such a way that the taped end of the wire is sticking out. Tape each of the ends of the wire – leave around 10cm of the wires sticking out.
- Use the sandpaper or knife to strip around 2cm of plastic cover off the wire ends. Make sure no red coating is left – just the copper wires.
- Part the wire away from the nail hole to keep it open and tape it in place. Stick the nail back in the hole and check if it can still spin freely.
- Get the four magnets, pair them; put one pair on each side of the nail that is in the hole in the box. Make sure the positions are balanced. Tape them to keep the magnets from moving. This will be the completed generator.
- Get the lamp and twist one end of the generator wire together with one of the bulb’s wire. Do the same for the other generator wire and bulb wire. Make sure the two twisted connections are not touching each other.
- Spin the magnet fast and the bulb should light. If it is not noticeable, do this test in a dark room so even a dim light can be seen.
- Clamp the nail to a hand drill so the spinning is fast enough. The faster the magnet spins, the brighter the light of the bulb should be. Be careful not to make the bulb light too long or get too hot to keep it from burning out.
This generator produces alternating current, and not direct current. The estimate output voltage that is generated is at a maximum of 2 volts.
Related Articles:
Basic Principles of an Alternating Current (AC)


