

Here’s another project – let’s create a bug robot! Please ask assistance from an adult as the activity is a bit technical. Follow precautionary measures, too, to eliminate the chance of mishaps. Okay, let’s start making a bug-looking robot!
Part 1 – Preparation
What you will need:
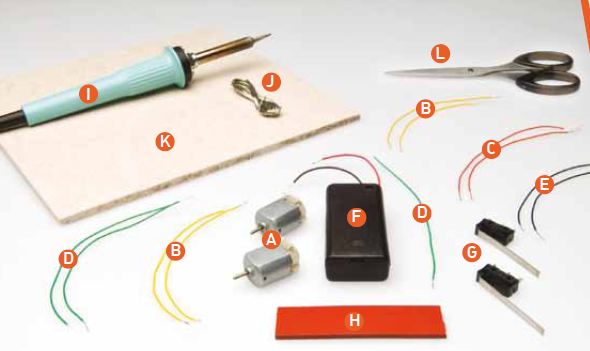
- 2 Motors
- 4 Yellow wires
- 2 Red wires
- 3 Green wires
- 2 Black wires
- 1 Battery box
- 2 Microswitches
- Foamex (80 x 20 mm)
- Soldering iron
- Solder
- Heatproof mat
- Scissors

What to do:
***Please take note that you must do your project on top of a heatproof mat.
- Get 1 microswitch. Attach a yellow wire to the left short metal terminal opposite of the antenna’s bottom area. Get your red wire and attach it to the middle terminal. Lastly, attach the black wire to the remaining terminal. Do the same with the second microswitch.
- Get your battery box. It should still have the red and black wire. Get your soldering iron and solder the green wire just beneath the spring. It must be directly opposite of the red and black wire. Take out the green wire and pull it out of the slit below the battery box.
- Get your first motor. Solder the green wire to the right terminal and the yellow wire to the left terminal. On your second motor, you have to do the opposite. Solder the green wire to the left terminal and the yellow wire to the right terminal.
- Get your foamex and drop it in hot water. While it’s still hot, place it on top of the battery box and bend both ends. The battery box will serve as the guidance as to where the foamex will be bent.

Part 2 – Building
What you will need:
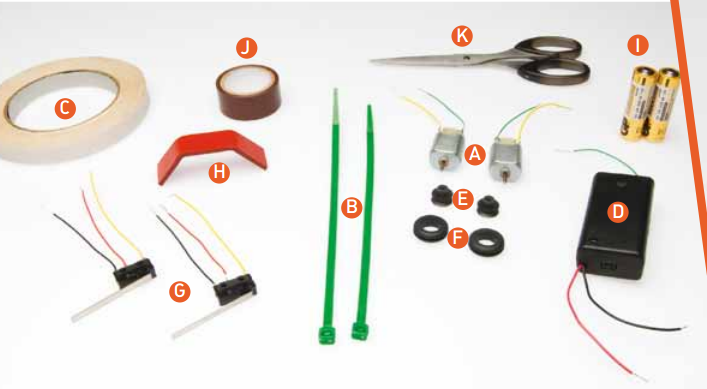
- 2 Motors
- 2 Cable ties
- Double-sided tape
- Battery box
- 2 Pulleys
- 2 Grommets
- 2 Microswitches
- Foamex wing
- 2 AA batteries
- Electrical tape
- Scissors
What to do:
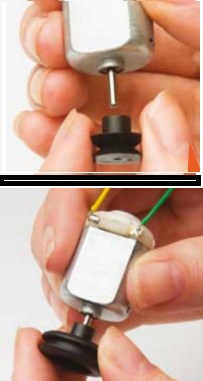
- Get one of your motors and attach 1 pulley to it. Make sure that you push as hard as you can in order to secure the position.
- Attach the grommet to your pulley. Secure it once again by pushing it hard enough. The pulley and grommet will serve as the wheel of your bug robot.
- Perform step 1 and 2 on your other motor.
- Get your battery box. Place a double adhesive tape beside the switch. Attach the foamex on top of it.
- Attach double-sided tape on both ends of the foamex. Attach the motor on one side of the foamex. Make sure that the motor’s green wire will be near the battery box’s green wire. Secure it using a cable tie and cut out the excess part. Do it on the other side of the foamex.
- Attach another double-sided tape on the battery box, next to the green wire. Attach the microswitches. The yellow wires must be in the center while the antennas should be pointing on the sides of your bug robot.
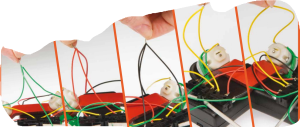
Photo Credit: Science Museum Learning - Twist all the ends of the green wires together.
- Twist all the ends of the red wires together.
- Twist all the ends of the black wires together.
- Get the left yellow wire on the microswitch and attach it on the yellow wire on the left motor.
- Get the right yellow wire on the microswitch and attach it on the yellow wire on the right motor.
- Make sure that wires are far from the other colored wires. Double check if the battery box is turned off. Place the 2 AA batteries inside.
- Push the left antenna. If it’s working, the left wheel should spin. Do it on the other side of the wheel.
- Now, turn on the battery box. Both wheels should work at the same time.
- Lastly, secure all tips of your wires using an electric tape so that they will not touch each other.

Related Articles:


