
To complete this safe, simple school experiment, you will need some low tech resources that you can probably find around the house. When you have assembled them you are ready to make your own capacitor and it is really easy.
TOOLS
Multi meter
Paper scissors
Paper glue stick
Somewhere to work
MATERIALS
Sheet of thin writing paper
Short length of aluminum foil
Two new paper clips
Some sellotape or similar
How to Make Your Own Capacitor
Cut three equal size pieces of aluminum foil say one inch square each. Cut out a piece of paper on which you can lay the squares with a quarter-inch margin between them. You also need an eighth-inch margin on the perimeter. Draw lines as shown. You do not have to be 100% precise. Extend the lines to the other side of the paper.

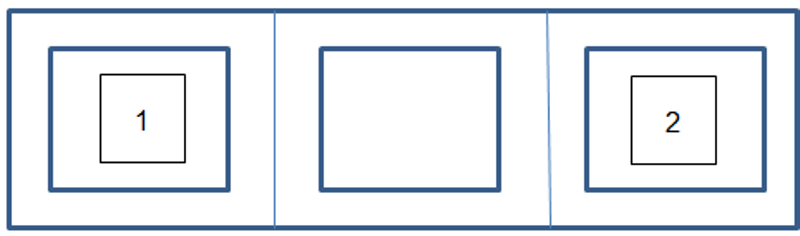
Set aside one square of foil as a spare. Let the positions of the other two pieces be ‘1’ and ‘2’ respectively as in the second diagram. Fold the paper from right to left over ‘1’. Then fold ‘2’ back over itself to the right to create a zigzag pattern. Crease the folds, and then smooth the paper out. You are now ready to make your own capacitor.
Now comes the Exciting Bit
Glue one foil square in place in position ‘1’. Take one paper clip and open one end. Apply glue to the middle section. Place the paperclip vertically across the middle of the foil with the straight end sticking out the bottom. Fold the paper over to create the first capacitor plate.
Create the second capacitor plate on the reverse side of position 2. This time, the straightened end of the paperclip must stick out at the top. Fold the first plate back over it from right to left and glue securely in place. Roll the completed capacitor into a tight vertical tube while the glue is still moist. Secure it with a strip of sellotape or similar. You should have something that looks approximately like the real thing. You now know how to make your own capacitor at home.
Connect the multimeter to the paperclip ends sticking out. You should detect slight movement of the indicator. Charge your capacitor with two AA batteries for a few moments. The second reading will prove you made your first film capacitor. How easy was that? Here a neat video showing how to do the same thing a slightly different way.
Related
Which AA Battery Brand Is Best?


