If you are a music enthusiast, finding a good speaker is certainly a must in order for you to appreciate the music better. One of the many choices people prefer these days are electrostatic loudspeakers or ESL. ESLs are the thin and tall speakers you see probably on your friend’s house or in theatres.
ESLs do not use electromagnet to emit sound efficiently. Other people may think, “Why do they need to create ESLs when a speaker that uses electromagnet is easier to construct?” That is because of the quality of the sound it emits. Electrostatic loudspeakers use high voltage electric field to emit statically charged membrane, therefore providing more linear and lower-distortion motion.
An electrostatic loudspeaker has a huge, thin and conductive diaphragm panel, with positive and negative charged ends, enclosed between two conductive plates. When attached to an electrical current from a wall outlet, it creates an electrical field. The diaphragm will swiftly change charges whenever the current of audio signals runs through the diaphragm. When the diaphragm is on its positive charge, it will be drawn towards the negative conductive plate, and when it’s on its negative charge, it will be drawn towards the positive conductive plate. During the course, the ESL produces clear and accurate sound because the diaphragm vibrates the air coming from the front of the speaker.

One weakness ESL has is that it lacks bass, therefore to compensate, most are now made with woofers.
Please take note that the size of the room is important when choosing the right ESL. No matter how perfect your ESL is crafted, it will not perform well if placed in a room bigger than what it is really intended for.
So right now, I will show you how to make an electrostatic loudspeaker and try to demonstrate with you how it really works. I am posting a YouTube video from DSCDocumentaries for better visualization but the procedure will be far different because of course, the machines used on the video may not be used at home.
The tutorial is from the expert Mark Rehorst.
Warning:
Not suitable for kids so please, do not let your kids play around while doing the project. The ESL needs hazardous materials and high-powered voltages. Please use protective glasses all the time.
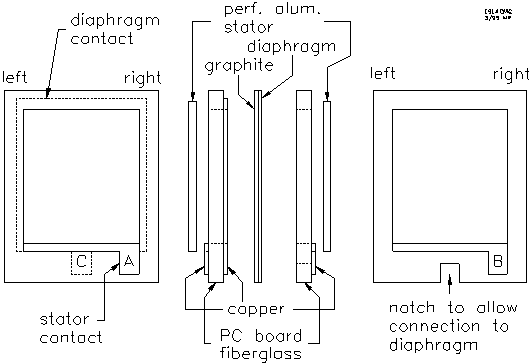
Making the Speakers
What you will need:
- Woofer
- 5-6 microns plastic film – preferably Mylar or other polyester
- Diaphragm coating – you can use powdered graphite, dish soap or antistatic solution
- Perforated aluminum or steel that has 60% holes – do not use ones that have more than ¼” holes.
- Acrylic or Fiberglass PC board stock for driver frame – Note: Fiberglass is very hard to cut and the dust you get from sawing can impose health risks.
- 3M contact cement
- High end DC Bias Supply (1000-5000 VDC, almost no current) – You’ll need voltage diodes and capacitors, a few resistors, a circuit board and a line cord.
Making the Electrostatic Loudspeakers:
Design your Drivers
Decide as to how huge your drivers will be. Basically, smaller drivers are easier to construct, however, you will need a lot of it so mounting will be very difficult. So when designing a driver, you need to consider a lot of factors such as DC bias and the insulator thickness. Here’s a guideline from Mark Rehorst about the appropriate sizing:

Please take note that if you intend to double the size of your insulator for lower frequency, you have to uplift the voltage to up to 4 times.
Quoted from Mark Rehorst:
“There is a “rule of thumb” about the dimensions of an ESL that relate to the insulator thickness. The rule is that the diaphragm should be supported at least every 100X units, where X is the thickness of the insulator pieces. ‘Supported’ means that you should put insulating strips in the driver to support the diaphragm in at least one direction. ‘One direction’ means that long narrow drivers are OK. If you use insulators that are made from 1/16″ PC board stock, the diaphragm should be supported every 4-6 inches. If you look at Martin- Logan ESLs you’ll see they have support insulators every 4-6 inches and that they are unevenly spaced, presumably to move resonances of each section to different frequencies.”
Creating a woofer may need expertise so if you have an available woofer, skip that part and use that one. However, if you do not have one, there’s a very nice step-by-step guide from ASCAS posted on Instructables. You can also buy a new woofer from the nearest appliance store.
So going back, here are the steps needed to be accomplished to come up with a good ESL:
- Get your perforated aluminum or steel (insulator). Add adhesive tapes around it then on the middle, about a meter apart. Set aside.
- Get your plastic film and stretch it thoroughly until the wrinkle is gone. It is better if you attach it on a table stretcher and pump air underneath so as to get rid of the wrinkles efficiently.
- Now let’s work on its resistive coating. Get your graphite and apply a very thin layer on the entire diaphragm.
- Get a cotton ball and rub the graphite on the film as hard as possible. The film must be thoroughly coated so as to uplift its resistivity.
- To check the resistance, grab some penny and drop it on top of the diaphragm. Using your digital multimeter, measure each penny and make sure that it is not lower than 100K. If the resistance is lower, get another clean cotton ball and rub it thoroughly once again. A high resistance is important so that in case when a bug is stuck inside your ESL, it will not flame out or crank the volume too high and your speakers will arc. If that happens, you have to build a new ESL once again.
- Now, since the graphite is within the film, you must now clean it. In order to do that, get a vacuum and install the brush attachment and vacuum the entire surface of the film.
- Wash your hands thoroughly and make sure that there will be no graphite left.
- Get a clean cloth add alcohol on it. Make sure it is not too wet. Wipe the insulators thoroughly.
- Stick your perforated aluminum of steel underneath.
- Using high quality glue, preferably Scotchgrip #4693, apply it around the diaphragm.
- Ask assistance from someone else as you place the second insulator on top of the diaphragm. Carefully do it because there will be no second chances in case you have misaligned the last insulator.
- Attach the woofer on the bottom part of the ESL. The sound of the woofer will travel through the ESL, thus, improving the quality of sound you may be able to hear.


