A microcontroller is a small computer on a single integrated circuit containing a processor core, memory and programmable input/output peripherals. Microcontrollers are designed for embedded applications, in comparison to the microprocessors used in personal computers or other general purpose applications. Microcontrollers are used in a wide variety of automatically controlled products and devices.
Microcontrollers can contain several general purpose input/output pins (GPIO). Each pin will make your LED light perform different functions (steady, blinking or fading). By sewing a stitch from the specific pin to your LED light, you can program your microcontroller to perform the desired function.
In this article we will show you how to make your own microcontroller patch out of simple and inexpensive products.
Materials needed
Tools needed
- Sewing needle
- Needle threader (if needed)
- Conductive thread
- Fabric scissors
- Hot glue gun and glue sticks
- Needle nose pliers
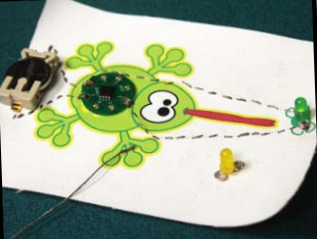
The microcontrollers should be pre-programmed to control the behavior of the LED. Curl the legs of the LED using needle nose pliers so that the LED can be sewn to the fabric.
If you are using a template, make sure you position the battery holder so that it lines up with the positive (+) and negative (-) holes.
Use a hot glue gun to glue the battery holder and sewable microcontroller to your patch. Be careful not to use too much glue so it doesn’t run onto any metal contacts.
Sew a stitch from the positive (+) hole on the battery holder to the positive (+) hole on the microcontroller. Next, sew from the negative (-) hole on the battery holder to the negative (-) hole on the microcontroller.
Figure out where you want to position your LED and hot glue it in place. Sew from the negative (-) hole on your microcontroller to the negative (-) side of your LED. Decide which action you would like your LED to perform (steady, blinking or fading). This will determine the hole in the microcontroller you will need to sew to from your LED.
Make sure there aren’t any loose pieces of thread on the back of your patch which could accidentally touch and cause a short. Dab some hot glue on your knots to make sure they don’t unravel and short out.
Insert the battery into the battery holder with the “+” side facing up.
Related articles:
How to Make Your Own Wearable Switch
How To Turn A Dough Into A Conductor And An Insulator
Experiment: Creating a Parachute with LED Bulb


